Welcome to My Blog

Welcome to my blog about the Greek myth of Prometheus. This blog is for my college work, nothing else.

Monday 6 June 2011

Conclusion Time: My Evaluation

When I heard that we had to do Greek Mythology for this project, I immediately thought about the myth about Prometheus, how he gave fire to man so we would survive. I’ve always loved mythology so I was really happy and excited about the whole thing.
I based my project namely on the fire that Prometheus gave the people because it’s one of the important parts of the myth and it’s also my favourite part. Through the project I was always wondering what to do next and experimented a lot. The thing I found went a bit wrong was when I did an experiment on some old acrylic and put the sentence ‘Man in God’s image’ on either side of the acrylic. I didn’t really like this much as I was out of ideas at the time, and even after I did it, it didn’t give me much to go on. I’m honestly not sure what I could of done to improve this. Whereas the other piece I did on acrylic gave me quite a bit to go on as it gave me another image of fire as well as the idea of a mobile.
A question I got that came up continuously through my work was whether I should do a final piece or not as I have many examples and show how I did everything. In the end, though, I got inspired to do a mobile and that became my final piece as the mobile symbolises the fire coming from Prometheus.
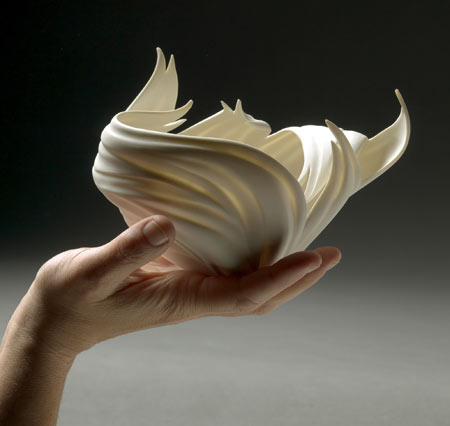
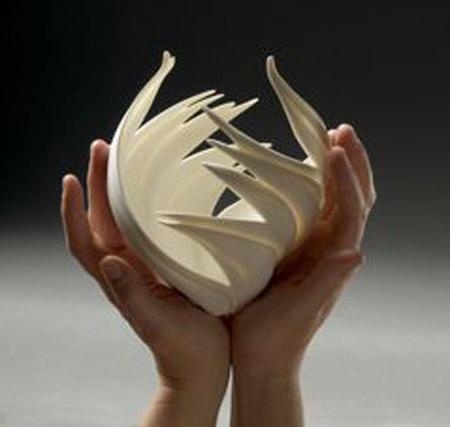
A few artists really inspired me, but none so much as Jennifer McCurdy. Her pieces called ‘Fire Vessel’ and ‘Fire Vessel #2’ really gave me the idea of fire dancing or moving gracefully. She showed me that fire could be beautiful and I wanted to enhance on that through my work.
I used many different materials through the project; acrylic, paper, plaster, etc. But my all-time favourite material would have to be the plaster as I loved how smooth it was and how I was able to carve into it, change its shape, and make a 3D effect with the image of fire.
All in all I really enjoyed the project and I wish it’d of gone on for longer so I could have even gone further with it. I would’ve made another mobile, but this one out of metal and then I’d of used the blow torch to turn the metal blue to show really hot fire. It’s a shame I didn’t have enough time to do so but I hope I do in the future.

Final Days 7-9: Dancing Fire


These are images of different fires. One is from a normal lighter that every day people use, and the other is from a blow torch in the 3D room of the college. I wanted to see what fires from different sources looked like and I also did a video of the fire from the blow torch so I could see how it moves. You can find the video below, but sadly it is sideways. I think it came out really well and I'm really happy with it.


Wednesday 1 June 2011

Final Days 7-9: Hanging from a Tree


 I decided to hang my mobile from a tree so the wind would have an effect on it and so it'd spin. These pictures so it spinning as it hangs from the tree. I think this went really well as the sky behind it makes it look really pretty, whereas the tree makes it look almost natural.


Final Days 7-9: My Final Piece III

My final piece in all its glory. I put the fishing wire through the holes I’d made in the pieces of plastic and tied knots so they wouldn’t fall out. These wires were then attached to the two pieces of metal sticks I got so that it could spin around like a mobile would in the wind. I turned the corners of these pieces of metal so that the string wouldn’t loosen or just slide of the metal. To do this I got a pair of pliers and bent the metal’s corners either in a circle or just at an angle. Once I did this I made the final piece, the hook, so it could hang from anywhere. I did the same thing with the small pieces of metal and bent the hook with pliers to make it curve. The wire in the middle that is attached to the smallest piece at the centre of the symbol was then gone around the middle piece of wire in a loop, and then tied in a knot to the second piece of metal before tying it to the hook. The middle two wires were attached to the small piece of metal, inside the two loops I’d made with the pliers. Finally the last two wires on the biggest piece of the symbol were attached to the bent corners of the biggest piece of metal. I think this went really well as the pieces spin around each other nicely just like any other mobile and my next step will be to take some more photographs of it else where.


Final Days 7-9: My Final Piece II


These are pictures of my final piece close up. I made these by first making a paper template, then drawing around it onto some see through plastic. Once I cut out the plastic using a ban saw I then had to tidy up the lines so I used a rasp to cut it close to the lines I marked out on the plastic. Afterwards I got a piece of sand paper and sanded down the edges so they weren’t sharp but instead smooth. To make it so the plastic had a scratched effect on it I used the sand paper over the plastic. After I did this I used a drill to put in small holes in each corner of the shapes. I really like this effect on the plastic as it makes it look cold even though it symbolises fire, something hot.
I think this went really well as I put in a lot of work towards it and my next step will be to finish it off as a mobile.


Final Days 7-9: My Final Piece I


This is a paper template that I made for my final piece which is now stuck in my book. I drew onto some paper the symbol I wanted before cutting out the three pieces I needed. I made sure to right on the words ‘CUT OUT’ so I didn’t accidentally cut it or tear it. I think this template went really well as without it I wouldn't of been able to go any further with this piece.

Saturday 21 May 2011

Day 6: Taking Things Further II


This is my piece of plaster that I made at the beginning, but this time I carved out the symbol of fire from the image I put onto the plate earlier on. I did this by first putting the plaster into some water for two minutes to soften it, followed by getting a small knife used for ceramics to carve out the image. Once I carved the image into the plaster I started to cut away at it with a chisel then smoothed it over to create the image of fire onto the tablet. I did think about adding from ink to colour it but I think it would’ve ruined it if I did. The images below show how the image I did on the plate is the same as the one I did on the plaster, and the other image is a close up of the plaster image.
I really enjoyed doing this and had a lot of fun while carving it out, although it took a lot of time and precision. As of yet I'm not sure how to take this further but I would really like to. This piece was really inspired by Jennifer McCurdy by the way her work would be nice and smooth with using porcelain. Although I used plaster, there are definate smililarties between the two materials. They're both smooth, white, and used in ceramics so I might go further into ceramics for this piece.


Day 5: Taking Things Further


This is the symbol of fire I had made earlier on acrylic and I did decide on taking it further by making out a paper model. I made it by making two paper templates, getting some string, and used glue to put it all together. I glued the string to one of the templates, and then glued the second template on top to make a kind of mobile. I’m thinking about going with this even further, maybe making a metal mobile. Below are images of the two templates before I put them together, then another of what it looked like laying down on a table (The image above is where it's being held up by the string).
I think this went really well as I plan to take it even further by making a metal mobile out of this design. My next step will be to measure out what I'll need and to make a metal template before making the mobile so both sides are equal. On the paper model you can easily see that the two sides didn't go together perfectly.


Day 4: The Symbol of Fire


This is an image of fire that I made with black tape onto another piece of white acrylic. I think I might take this further later on. It’s meant to show when Prometheus gave fire to man. I also think that this went really well as I really like this image so I feel inspired to take this even further. My next step will be thinking of how to take this further, through models perhaps.


This is a ceramic plate that I bought from a charity shop as it reminded me of the old ceramics used in ancient Greek. I put on the patterns with black and grey tape by cutting away at the tape with a scalpel then putting them onto the plate. It’s meant to show the image of fire that Prometheus gave to man to get them out of misery. This image, I think, went really well onto the plate like it did on the paper and I enjoyed doing it. By taking it further I think I'll put this image onto the plaster.

Day 3 Continued: Man in God's Image


These are pictures of what I did with white and black tape on an old piece of acrylic. One side I made all black with the black tape then cut away the image of man with a scalpel while I made letters to spell out ‘Man in’ with white tape. On the other side I put the image of man that I had cut out onto the middle of the acrylic and spelled out ‘God’s image’ with black tape instead of white. It shows how Prometheus created man in God’s image.
I think that this went really well as it also shows, in a way, yin and yang, black and white, etc; many differences between people in the world. My next step will to take this further in my work and maybe try to bring the idea of differences into my work with Prometheus.


Day 3: Rubbings of Words & Letters


This is an image of a rubbing I did from a grave, padlock, and another grave. All of the rubbings are together in my research folder with my life drawings, and I did these rubbings as the text used is quite old and reminds me of what they used back in ancient Greek myths. I think all the rubbings went really well, though some did look a little strange as I couldn't get them all done completely. My next step with these rubbings will be to try and bring them into my work on the story of Prometheus.

Wednesday 18 May 2011

Day 2 Continued: Bringing in my Life Drawings


This drawing was done by me thanks to a picture in my research that I used as a reference and from a picture I drew from life drawing. I drew it out first with chalk on the black paper before I added colour with different coloured chalks. Afterwards I smudged it. This is supposed to me Prometheus on the rock that he was tied to by Zeus where he would get his liver eaten out by a giant eagle once every day.


This is another picture I did thanks to the references I have in my research, including the pictures I drew in life drawing. In this picture I started with black pastel for the outline of his body and white chalk on other parts of his body. His hair I did with a brown pastel, and the red, orange, and yellow stains were done with ink. It shows Prometheus taking the fire from the sun for the humans down on Earth.

I think that both of these drawings were a lot of fun to do and came out really well. I was really inspired by Derek Hess and Egon Schiele with these drawings and I hope that people can see that.